Python ast 模块使用
Python 源码编译过程
Python 源码到机器码的过程,以 CPython 为例,编译过程如下:
- 将源代码解析为解析树(Parser Tree)
- 将解析树转换为抽象语法树(Abstract Syntax Tree)
- 将抽象语法树转换到控制流图(Control Flow Graph)
- 根据流图将字节码(bytecode)发送给虚拟机(ceval)
可以使用以下模块进行操作:
- ast 模块可以控制抽象语法树的生成和编译
- py-compile 模块能够将源码换成字节码(编译),保存在 __pycache__ 文件夹,以
.pyc结尾(不可读) - dis 模块通过反汇编支持对字节码的分析(可读)
ast 模块使用
ast 模块可以用于生成和编译 Python 代码的抽象语法树,许多静态分析工具都使用该模块生成抽象语法树。
ast.parse() 函数可以用来生成抽象语法树,ast.compile() 可以将抽象语法树编译为代码。
用下列代码作为测试样例:
1 | def nums(): |
编译执行
代码对象是 CPython 实现的低级细节,涉及 code 模块,该模块是解释器基类,可用于自定义 Python 解释器。
1 | # 读取源文件 |
生成 AST
直接从源码生成,Python 3.9 支持 indent 参数,打印输出更为友好。
1 | f_ast = ast.parse(data) |
得到如下结果:
1 | Module( # 第一级,模块 |
遍历 AST
修改 AST
有两种方式:①修改 AST 节点;②替换 AST 节点。ast 模块提供了 NodeVisitor 和 NodeTransformer 实现这两种功能。
-
将
i%2 == 0修改为i+2==0ast.NodeVisitor.visit如果没有实现对象的visit_classname方法,则调用generic_visit方法ast.NodeVisitor.generic_visit在子节点上调用visit方法
1
2
3
4
5
6
7
8class NodeVisitor(ast.NodeVisitor):
def visit_BinOp(self, node): # 修改操作符
if isinstance(node.op, ast.Mod):
node.op = ast.Add()
self.generic_visit(node) # 遍历子节点
visitor = NodeVisitor()
visitor.visit(f_ast) # 遍历输出如下:
1
2odd: 0
odd: 1 -
删除
else节点- 调用
compile()函数时缺失lineno和col_offset属性,使用ast.fix_missing_locations函数添加
1
2
3
4
5
6
7
8
9
10
11class NodeTransformer(ast.NodeTransformer):
def visit_If(self, node):
return ast.If(
test=node.test,
body=node.body,
orelse=[]
)
transformer = NodeTransformer()
f_ast = transformer.visit(f_ast) # 返回新的 AST
ast.fix_missing_locations(f_ast)输出如下:
1
even: 0
- 调用
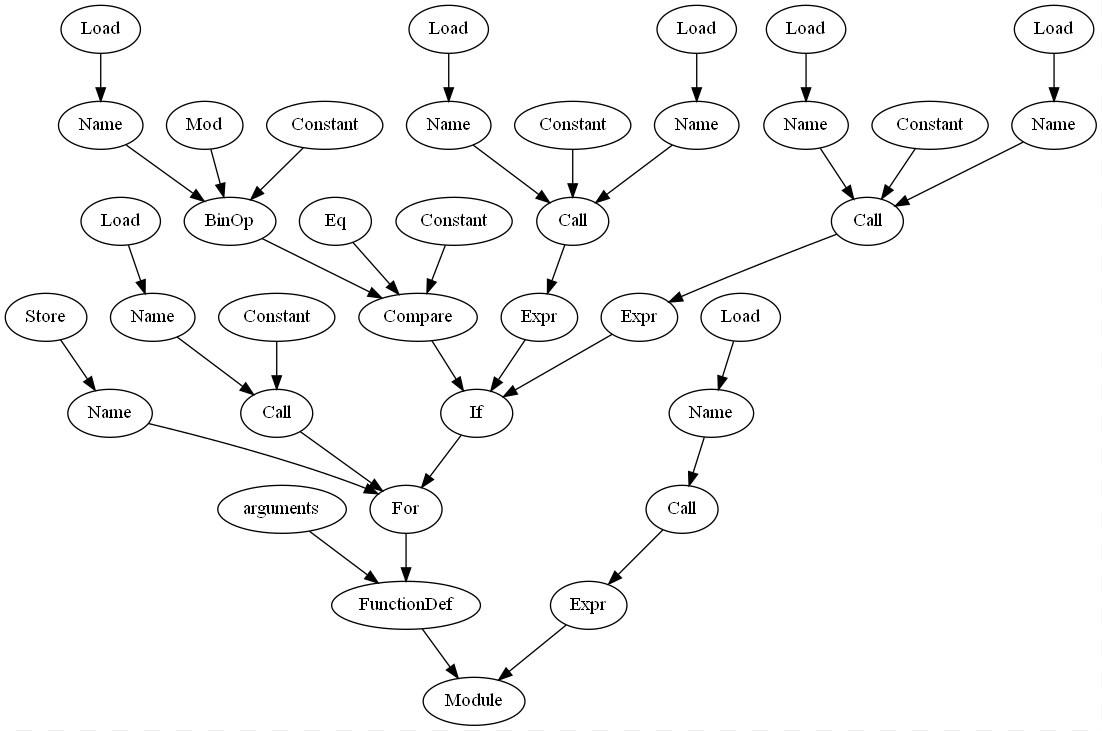
可视化 AST
使用 graphviz 绘制,遍历 AST 节点,将每个节点对象的类型名称作为点,父节点和每个子节点都连一条边。
-
安装 graphviz 二进制程序 👉 https://graphviz.org/download/
-
pip 安装包
1
pip install graphviz
1 | def visit(node, nodes, pindex, g): |
得到的 test.png 如下:
参阅
本博客所有文章除特别声明外,均采用 CC BY-NC-SA 4.0 许可协议。转载请注明来源 Jckling's Blog!
相关推荐

2021-05-10
使用 Docker 部署 Jaeger + Elasticsearch + Kibana
使用 Elasticsearch 作为持久化存储,部署 all-in-one 镜像/单独部署 Jaeger 组件;elasticdump 导出数据,Kibana 可视化追踪信息。
2021-11-05
CVE-2020-12691 漏洞利用相关信息追踪
使用 Jaeger 对 Keystone 进行追踪
2021-04-02
全链路追踪与 Jaeger 入门
全链路追踪及 OpenTracing 概念介绍,Jaeger Python 入门实验
2020-12-25
CentOS 7 安装 Openstack Rocky 版本 - 环境搭建
根据官方手册使用 CentOS 7 集群搭建 Openstack 基础环境。
2020-12-26
CentOS 7 安装 Openstack Rocky 版本 - 身份认证服务(Keystone)
在 Openstack 基础环境之上搭建身份认证服务。
2020-12-26
CentOS 7 安装 Openstack Rocky 版本 - 镜像服务(Glance)
在 Openstack 基础环境之上搭建镜像服务。
2020-12-26
CentOS 7 安装 Openstack Rocky 版本 - 计算服务(Nova + Placement)
在 Openstack 基础环境之上搭建计算服务。
2020-12-27
CentOS 7 安装 Openstack Rocky 版本 - 网络服务(Neutron)
在 Openstack 基础环境之上搭建网络服务。
2020-12-28
CentOS 7 安装 Openstack Rocky 版本 - 对象存储服务(Swift)
在 Openstack 基础环境之上搭建对象存储服务。
评论